Starlink utilises
CG-NAT to deliver service so a direct connection to a Starlink node from elsewhere on the Internet isn't possible. A solution is to establish an outbound VPN connection from the Starlink node, and subsequently route inbound traffic to Starlink across the established VPN link.

Why do this? In my particular use-case Starlink is deployed at a remote holiday home I want to monitor and manage whilst I'm not there.
There are any number of ways a VPN can be implemented. In this solution
OpenVPN is used to establish a connection from a
Raspberry Pi at the Starlink node to a
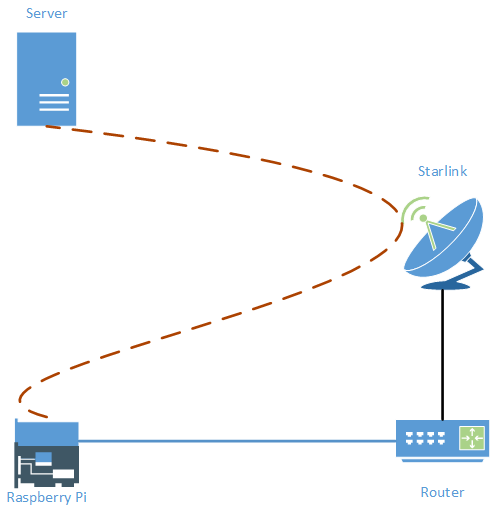
Redhat Enterprise Linux Server elsewhere on the Internet, as depicted in the diagram below. OpenVPN is supported by a variety of platforms so my choice of Raspberry Pi and Redhat is immaterial: the configs presented here should work on any platform.

The network topology in this example is depicted below. We're going to establish a network-to-network VPN between the network 192.168.0/24 behind the Server, and the network 192.168.1/24 behind the Raspberry Pi Client. In order for this to work the Server requires an IP address which is connectable on UDP port 1194.

- First we need to generate a secret key. We do so with the command:
openvpn --genkey --secret static.key
The resulting file needs to be deployed to the Raspberry Pi and the Server, on both platforms the default location is /etc/openvpn/static.key
- Next we configure the Server to accept VPN connections. Edit the configuration file /etc/openvpn/server/server.conf to contain these values:
dev tun
proto udp4
ifconfig 10.0.0.1 10.0.0.2
route 192.168.1.0 255.255.255.0
keepalive 10 60
secret /etc/openvpn/static.key
cipher AES-256-CBC
Start the OpenVPN service with the following command so we can see errors and connections in the console:
openvpn --config /etc/openvpn/server/server.conf
- Now it's time to configure the Raspberry Pi Client. Edit the configuration file /etc/openvpn/client/client.conf to contain the following values, remembering to include the public IP address of the server:
remote <remote IP Address of Server>
proto udp4
dev tun
ifconfig 10.0.0.2 10.0.0.1
route 192.168.0.0 255.255.255.0
secret /etc/openvpn/static.key
persist-tun
persist-key
keepalive 2 10
cipher AES-256-CBC
resolv-retry infinite
Start the OpenVPN service on the Client with the following command. We should see the VPN tunnel established in both consoles:
openvpn --config /etc/openvpn/server/server.conf
Check to ensure the connection is operating properly with ping:
ping 10.0.0.2 -from the Server.
ping 10.0.0.1 -from the Client.
If ping doesn't work, check our firewall settings to ensure traffic is allowed across the VPN tunnel, which is probably device tun0.
- At this juncture a VPN connection has been established between the Client and the Server. Now we need to enable routing between the two networks. On both servers issue the command:
/bin/echo "1" > /proc/sys/net/ipv4/ip_forward to enable IP forwarding. On both systems append the same command to the file /etc.rc.local so that forwarding persists across system restarts.
- Finally we need to enable routing between the networks. On the Server side, publish a route to 192.168.1/24 with the internal IP address of the Server as the gateway. On the Client side publish a route to 192.168.0/24 with the internal IP address of the Raspberry Pi Client as the gateway.
Test everything is working with ping between systems on either side of the VPN. Enable the OpenVPN service on both systems so it persists across restarts and we're done: whenever Starlink is connected to the Internet the Raspberry Pi will establish a VPN connection to the Server, and re-establish it if it drops out.